You have old, unattractive floor tiles attached to the concrete surface, and they need to go, pronto! It’s a tough task, but don’t worry, we’ve got your back.
In this guide, we’ll walk you through every step of how to remove floor tiles from a concrete floor – from safety measures and tool selection to removal techniques and cleanup.
You’ll learn how to tackle this task with confidence and make way for your new, beautiful flooring.
Key Takeaways
- Prioritize safety by wearing protective gear and preparing your workspace.
- Identify the type of floor tile and its attachment method to choose the proper removal technique.
- Gather essential tools like a hammer, chisel, and floor scraper, and consider a tile removal machine for larger areas.
- Perform a thorough cleanup after tile removal, including sweeping and vacuuming debris.
- For tough or complex removals, seek professional assistance for expert stone protection and renovation service.
How to Remove Floor Tile From a Concrete Floor: Safety Gears and Preparation
Before you dive into your tile removal project, it’s important to prioritize your safety and adequately prepare your workspace.
Start by donning your safety gear. This should include:
- safety glasses to protect your eyes from flying debris
- a dust mask to keep you from inhaling dust particles
- thick padded gloves to protect your hands
- long pants
- a long-sleeve shirt
- closed-toed shoes
- kneepads
Once you’re geared up, clear the area of any furniture and fittings that could be damaged during the process. For items you can’t move, cover them with drop cloths.
Remove any trim and baseboards, and turn off any AC units, HVAC systems, and fans to prevent dust circulation.
With these steps, you’ll create a clean, safe workspace for your tile removal project.
The Right Tools for Tile Removal
Once you’ve set up your workspace, it’s time to gear up and gather the necessary tools for the tile removal process. Here are the basic tools you need:
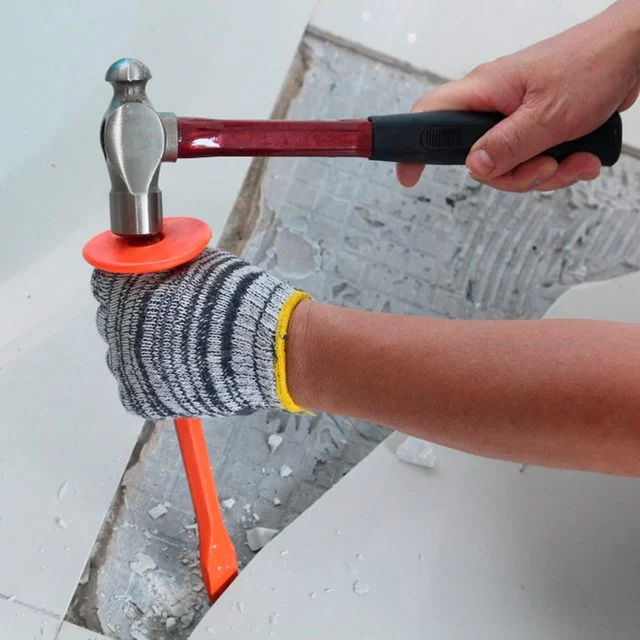
Hammer and Chisel
A sturdy hammer and a chisel are essential for loosening and prying up the tiles.
Floor Scraper
This tool is used to scrape away the remaining adhesive in the grout once the tiles have been removed.
Cleaning Tools
A broom and a shop vacuum will be necessary for cleaning up the debris after tile removal.
Identifying the Tile Type & Tile Floor Adhesive Removal Method
After you’ve gathered your tools, it’s crucial that you identify the tile type and how they are attached to the concrete floor, as this will determine the appropriate removal technique.
Some tiles may simply be floating or clicked into place. In this case, you can usually slide a thin pry bar beneath one edge and gently lift it up.
Others, however, might be fixed with a strong adhesive. These tiles may require a bit more effort to remove and you might need to scrape or even break them. It’s also important to identify the type of adhesive used, as some are easier to deal with than others.
If you’re removing old linoleum or vinyl tiles from a concrete floor, check for asbestos first. Tiles and adhesives from before 1980 might have asbestos for fire resistance and insulation.
Since it’s risky to health when disturbed, leave asbestos removal to the pros, or cover it with a concrete layer instead.
Once you’ve determined the tile type and attachment method, you’re ready to proceed with the next steps of the tile removal method.
Removing Ceramic Tile From Concrete
First, you’ll need to use a grout saw to carefully remove the grout surrounding each tile you’re planning to remove. This step is crucial as it loosens the tile and makes the chiseling process easier.
Now, follow these steps to remove your ceramic tiles:
- Find a Starting Point: Look for a loose, cracked, or broken tile to begin. Areas with bad grout also work well.
- Use the Right Technique: Wedge a masonry chisel under the tile at a 45-degree angle. Hit it with a mallet to lift off tiles. For stubborn tiles, smash with a sledgehammer and chisel out the pieces.
- Prepare the Area: Remove baseboards with a hammer or screwdriver, and cover HVAC vents to block dust spread.
Removing Vinyl Tile from Concrete
- Loosen the Tile: Start prying at a corner with a putty knife. If it’s tough, slice through the tile with a utility knife to get under it.
- Lift Off the Tile: Slide a putty knife or floor scraper under the tile. For sticking tiles, heat them with a hairdryer or heat gun to weaken the glue.
- Peel and Repeat: Once loosened, peel the tile from the concrete and move on to the next.
Removing Tile Adhesive
- Underlayment Removal: Get rid of any underlayment or backer board.
- Mastic Adhesive: Scrape off what you can. If it’s stubborn, use hot water or a commercial remover, then scrape more.
- Thinset Mortar: Since it hardens like cement, chip away with a chisel, scraper, or rotary hammer with a removal bit.
- Safety Gear: Wear a mask and goggles; thinset removal is dusty work.
Removing Tile From a Concrete Floor Using a Hammer Drill

What if the tiles are deeply embedded and a chisel just won’t cut it? That’s when a hammer drill comes in handy. This power tool, with a chisel attachment, works like a jackhammer and can save you time and energy.
To start, find or create a starting point with a chisel and mallet. Attach the chisel tip or a floor-scraping attachment to the hammer drill.
Then, set the drill at an angle on the starting point and switch it on. Move from one tile to another, letting the hammer drill break through the tile and grout.
Here’s a quick process overview:
| Step | Tool | Action |
|---|---|---|
| 1 | Chisel and Mallet | Find/Create Starting Point |
| 2 | Hammer Drill | Attach Chisel Tip |
| 3 | Hammer Drill | Break Through Tiles |
Machines You Need To Remove Floor Tiles From Concrete
Tile removal machines can be used to tackle larger projects or tiles that are stubbornly adhered to. These machines are powerful and designed to make the tile removal process much faster and easier.
Types of Tile Removal Machines
When you need to remove tile from a large area or a whole floor, think about what kind of tile removal machine you’ll need. There are two kinds – propane-powered and electric.
If you’ve got a big space and aren’t worried about the cost, a propane-powered machine might be right for you. It’s wireless so you can move around freely, but it’s more expensive and can be a bit tricky to handle.
For DIY at home or if you’re trying to save some money, an electric tile stripper is a great choice. It’s more affordable, easy to find, and does a good job on concrete floors.
Depending on the size of your project, you can either rent or purchase a machine. Both types let you use different blades to tackle various tile types.
Blades
When you’re removing tiles with a machine, picking the right blade is key. The standard blade that comes with the machine is good for lifting regular ceramic tiles that aren’t stuck on too hard.
But if you need to get rid of the strong mortar underneath the tiles or any tough glue, you should use a steel-hardened blade that’s made for heavy-duty work.
Choosing the right blade means you’ll get those tiles up faster and more effectively.
Pro Tip:
If the blade on your tile removal machine isn’t working great, try changing its angle. A steeper angle might chop through the tile faster but be careful—it can damage the concrete floor underneath.
If you lower the angle, you’ll get a neater job, but it’ll take more time to remove the tiles.
Experiment to find out what angle works best for your floor, and fine-tune it to get the tiles off just right. With the right blade and angle, you can use any tile stripper machine on a concrete floor.
After using these machines, you’ll need to clean your workspace thoroughly, as they can cause a lot of dust and debris.
Cleaning and Restoring Post-Removal
After you’ve used a tile removal machine, you will be left with a significant amount of dust and debris that needs to be cleaned up promptly.
| Stage | Tool | Purpose |
| Initial cleaning | Broom | Sweep away large debris |
| Detailed cleaning | Shop Vac | Remove smaller particles |
| Thorough cleaning | Wet-Dry Vacuum | Remove dust and fine particles |
| Deep cleaning | Pressure Washer | Clean thoroughly, if necessary |
Once clean, assess the subfloor for damage. If you spot cracks or uneven surfaces, consider hiring a professional to restore them. Proper restoration ensures a smooth base for your new flooring.
Costs Associated With Removing Old Tiles From Concrete
The costs involved can vary depending on the size and complexity of the job. It’s not just the labor cost you need to account for, but also:
- Rental or Purchase of Tools: You’ll need specific tools like chisels, mallets, or even a hammer drill. Renting or buying these can add to your expenses.
- Disposal Costs: Removing tiles creates a lot of debris that needs proper disposal, which often comes with a fee.
- Safety Gear: Don’t skimp on safety! Items like safety glasses, dust masks, and gloves add to your project’s cost.
- Possible Repair Works: If the removal process damages your concrete floor, you might need to spend extra on repairs.
Preparing the Subfloor for New Tiles or Flooring
After thoroughly cleaning and restoring your concrete subfloor, you must prepare it properly before installing your new flooring. The preparation process ensures the longevity and durability of your new floor.
- Check the concrete for cracks or uneven areas. You’ll need to fill cracks with a concrete patch product and sand any high spots for a smooth surface.
- Concrete can hold moisture, which can damage certain types of flooring. Conduct a moisture test using a moisture meter or a simple plastic sheet test.
- If the subfloor is uneven, use a self-leveling compound. This product will create a flat, level surface for your new flooring.
- Apply a primer to the subfloor. This helps the adhesive for the new flooring to bond better with the concrete.
Understanding the Desired Flooring Outcome
Having a clear picture of the desired outcome will guide you in preparing the subfloor and choosing the right materials and methods.
Let’s take a look at a simple table to clarify this:
| Desired Outcome | Subfloor Preparation | Material Selection |
| Hardwood | Smooth, level | Wood planks |
| Tile | Flat, clean | Ceramic, porcelain tile |
| Carpet | Smooth, dry | Carpet pad, carpet |
Conclusion
And there you have it, a complete rundown on how to remove floor tiles from concrete.
It’s going to be noisy, dusty, and a bit daunting, but with the right tools and techniques, you’ll manage to clear the way for your new flooring.
With your floor clean and prepped, you’re all set to start your exciting renovation journey.
But, should you find the job too tough or prefer a professional touch, don’t hesitate to reach out to Stone Protection. Our skilled team is on standby, ready to step in and take the tile troubles off your hands.
FAQs on How to Remove Different Tiles From a Concrete Surface
What is the easiest way to remove tile from a concrete floor?
The easiest method often involves using a chisel and hammer to break up the tiles first, then using a concrete grinder to smooth the surface, especially if you want to remove the adhesive residue and ensure a clean finish.
Can tile be removed from concrete?
Yes, tile can certainly be removed from a concrete floor. This process typically requires a combination of manual labor to break the tiles and power tools to remove the adhesive and clean the surface.
What is the easiest way to remove floor tiles?
The easiest way to remove floor tiles is by scoring the grout with a grout saw and then prying up the tiles with a floor scraper or a similar tool. For vinyl floor tiles, heating them with a heat gun may soften the adhesive, making it easier to lift the tiles.
How do you remove tile adhesive from the concrete floor?
To remove tile adhesive from a concrete floor, use a concrete grinder, which can efficiently clear away leftover adhesive and smooth the surface for any new flooring you might want to install.
What tool can remove a tile from concrete?
A heavy-duty floor scraper is a common tool for prying up tile shards, while a jackhammer fitted with a chisel attachment can be used for larger areas or where there’s a significant amount of broken tile.
What is the best tool for removing tile?
For removing ceramic floor tiles, a power floor scraper or an electric hammer chisel is considered the best tool as both can handle the rigidity of the tiles and the strength of the adhesive bond with greater ease compared to manual tools.